In order to allow Heads-of-Delegation to upload participant data more quickly, a ‘CSV Upload’ feature is available. Using this feature you can upload a comma-separated-values file and enroll several participants at once. The process takes several steps to complete, but if all the data in your CSV file is correct, you may only need to click on the ‘Continue’ button several times.
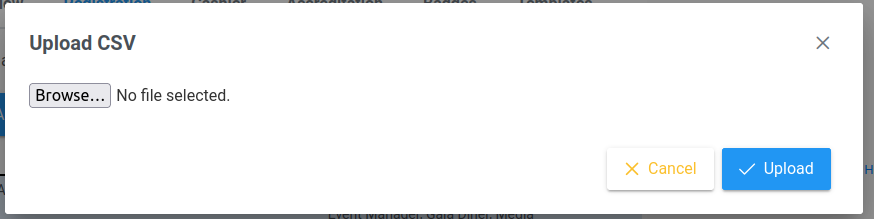
To open the CSV Upload dialog, click on the ‘Upload CSV’ button on the ‘Registration’ tab, next to the ‘Add Registration button. A dialog window will open where you can select a file to upload.
The file you select should be a:
- regular text file (not an Excel spreadsheet)
- using UTF-8 encoding
- with comma-separated values
- and double-quote quoted cells
- with cells in the following order: Last name, First name, Gender, Date of Birth, Events and Roles
- and no headers
However, the system was created with some leniency:
- if you don’t know about UTF-8, the system will try to decode otherwise encoded files. It may work out. Please pay special attention to people with names containing ‘special characters’ like ‘á’, ‘ß’ or ‘æ’.
- if you use semi-colon separated values, it may also work out of the box
- you can indicate the correct column contents in the second step, so if your columns are not in the right order you can fix this manually
- and you can indicate to skip 1 or more rows in case you have headers in the output file
CSV Contents
The CSV file should contain the following data:
Last name: the surname of the person to be registered. The system will capitalize the name itself. A last name should have at least 2 characters to be valid.
First name: the first name of the person to be registered. A first name contains at least 1 character.
Gender: can be specified as ‘M’, ‘F’ or ‘W’ (the latter two both referring to female genders). Although more genders exist, these genders are the only two related to competitions. No option to select an ‘Other’ gender exists currently, but gender is not displayed on accreditation badges, etc. It is only used for determining the right competitions.
Birthday: date of birth should be indicated as year-month-date with a four digit year. For example: ‘1963-08-07’ for August 7 1963. Alternative dates may work, but there may also be interpretation problems. You can set the date representation in Excel for the whole column to the required format.
Events: the events column specifies for which events the participant should be registered. These can be referenced using the regular competition abbreviation (‘ME1’, ‘WS3’). You can also skip the category number and have the system find the competition of the category of the participant (i.e.: ‘ME’, ‘WS’). You can even skip the gender and only indicate the weapon (i.e.: ‘F’ or ‘S’) and have the system determine the right competition using the gender and date of birth.
The events column can also hold any team roles the participant will take on, like ‘Coach’, ‘Team Armourer’, ‘Head of Delegation’, etc.
For non-competition events, use the abbreviation as displayed on the ‘Overview’ tab in the registration system.
Alternatively, you can indicate a certain column contains an ‘X’ for a specific competition. For example, a column marked ‘ME1’ will contain an ‘X’ if that participant wants to participate in the ‘ME1’ competition. You will need to set the content header to ‘ME1’. Any cell with a value in it will be marked as a registration for that competition. This only works for competitions, not for roles and non-competition events.
Setting Cell Content Headers

After selecting the CSV file, the file is transferred to the server, checked and disected. The result is displayed using a selection of the first rows and the last rows. For each column, you can indicate the column content. In the image above, the last column is selected as ‘Events’ column. The first two columns need to be changed (Last name and First name are switched around). At the top it is indicated that the first row should be skipped.
After setting the right column headers, click on ‘Check Fencers’ to proceed to the next step.
Checking and Selecting Personal Data
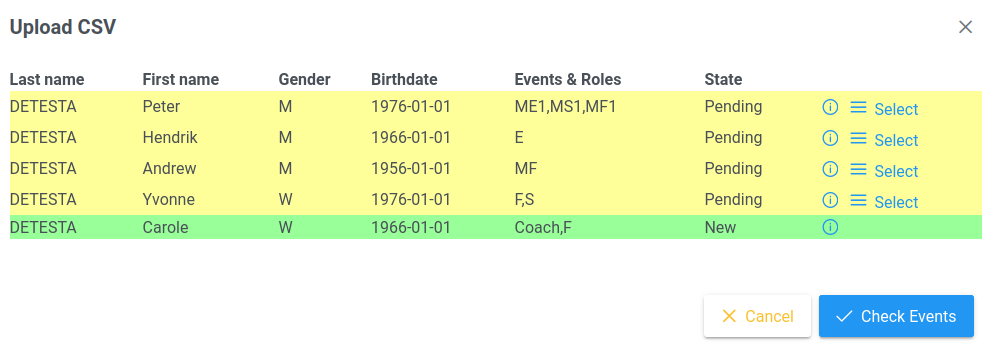
The ‘Check Fencers’ step tries to find fencers from the database to match with the uploaded data. If no fencer can be found at all, the line is indicated as ‘New’ (see the ‘State’ column above). For other entries, either an existing fencer was found (state: ‘Found’, when name and birthday all match), or a selection of suggestions was found. In the image above, 4 people have a list of suggestions.
If there are errors in the date of birth, the gender specification, missing names, etc, the line will be displayed with a red background and the information icon on the right will have a tooltip indicating what kind of problems were found. Please update your CSV and upload the data again.
If you click on the ‘Select’ label, the ‘Suggestion Dialog’ is displayed allowing you to pick from a list of suggestions.
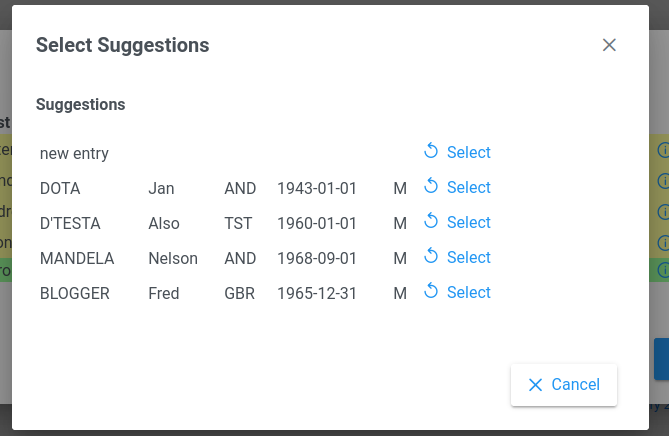
Clicking on the line of ‘new entry’ will mark this entry as a new fencer. Clicking on any other line will select the relevant person as being the one you really wanted to enter. The list of suggestions may contain a variety of people, possibly from different countries.
Once selected, the dialog closes and the line of the relevant person gets a green background. It’s state turns to either ‘Selected’ (if a specific person was picked) or ‘New’ (if a ‘new entry’ was selected). Once all the lines are green you can click on the ‘Check Events’ button to proceed to the next step.
Check Events
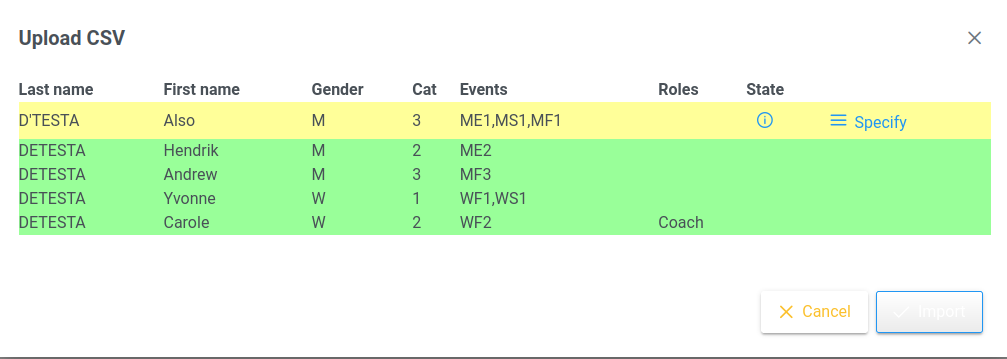
Similar to the ‘Check Fencer’ step, the ‘Check Events’ step will list all fencers and the events for which they want to be registered. If the line has a green background, all roles and events for the person could be found. In the image above, you can see that weapon-indications like ‘E’ and ‘F’ were converted to the correct competition (ME2, WF1) for those people.
If an event was found, but for a different category or gender, the line is marked in yellow. In the image above, the first line indicates a person of age category 3 that wants to register for competitions ‘ME1’, ‘MS1’ and ‘MF1’, all of age category 1. You can click on the ‘Specify’ label to open a dialog that lists the suggestions. Click on each suggestion to change the competition. If the suggestions are incorrect, you will need to update your CSV file and retry the upload.
If an event was not found at all, the background will be red. In that case you need to adjust your CSV file and retry the upload.
After selecting the last suggestion, all lines are green again and you can click the ‘Import’ button to enter the last step.
Importing
As soon as you click on ‘Import’, all fencers will be registered in the database one at a time. After all fencers were registered, their competition and roles will be stored. This process is indicated in the dialog using coloured backgrounds and a status column.
- status ‘Pending’ means the person data needs to be stored still
- status ‘Imported’ means the person data was stored but the competition and role information needs to be sent still
- status ‘Done’ means the person and his/her registrations were all stored.
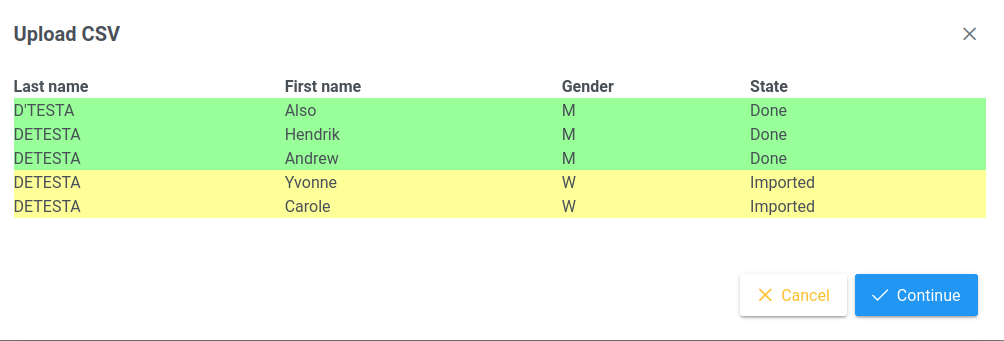
Once all lines are marked ‘Done’ with a green background, you can click the ‘Continue’ button to close the dialog window. The participant list will now be reloaded automatically and your new registrations should be displayed.
Redo the Import
If you make adjustments to the CSV later on and want to redo the import, that should not be a problem. However, please note the following:
- if you change names, gender or date of birth, the person may not be found automatically and you may need to select the right person from the suggestion list
- changing someones date of birth may have implications for the category of competitions (and, of course, similar for gender)
- people can only register for a competion or role once. It is no problem if you re-register a person for the same competition again: the previous registration will be overwritten
- the import does not allow you to unregister a person. If someone wants to move from MF1 to ME1, you should manually unregister that person from MF1. You can then add ME1 (or ‘E’) to the events of that person in your CSV and redo the import.